AutoTune is JFBConnect's Auto-Configuration wizard. It can be used to automatically configure your Facebook Application, enable the required plugins for Joomla, and then perform an error check to ensure things are working properly.
In order for Autotune to access your application's settings, you must enable the "Allow API Access to App Settings" option in your Application's Security section on developers.facebook.com.
Once in Autotune, you should see a welcome page like below:
Ensure that the "Basic Checks" area at the bottom have a green check mark next to each. If an error is shown, you will need to correct the issues. When done, click "Start".
Autotune requires your Facebook Application ID and Secret key as well as your SourceCoast Subscriber ID to automatically configure your settings. Other social network keys can be entered here, but are not required as remote configuration of those applications are not currently allowed. However, if you do not enter the other social network keys, you will not be able to use their respective authentication features of JFBConnect.
Enter the information as shown above. The information required is:
Click "Save".
If you receive an error that your Subscriber ID is invalid, please enter and save your Subscriber ID. The subscription status should update similar to the following:![]() If expiration date does not update properly but your user name is correct, you can attempt to Refresh the status by clicking the "Refresh" link next to the "Last Checked" field.
If expiration date does not update properly but your user name is correct, you can attempt to Refresh the status by clicking the "Refresh" link next to the "Last Checked" field.
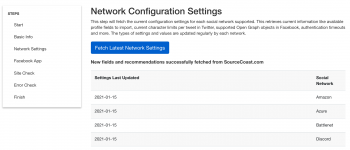
The next page will allow you to fetch network settings for each of the available social network providers. Information such as profile fields to import, supported Open Graph object types, posting character limits, etc need to be retrieved. Some features of JFBConnect require this information before configuration.
The next page will automatically configure your Facebook application with the up-to-date recommendations from SourceCoast.com. Your fields and recommendations may look different than the images below. JFBConnect loads and displays fields relevant to your Joomla and website configuration.
It's recommended to use the "Set All Recommendations" button to quickly configure most settings for your application. Some settings, like Privacy URL, Terms of Service and Contact Information should be entered manually as there is no way for JFBConnect to automatically detect these details.
Tip: If you don't already have a Privacy Policy, you can use this Privacy Policy Generator to create one for you. Facebook requires that you have one on your site. (Thanks to chrmat1 for the tip)
Once you've you set the recommended values, check for any application settings in red, and update them as necessary. You can learn more about each setting by hovering over it's name.
When done updating settings, click "Save Custom Settings". In some cases, it's perfectly normal to have settings in red. If you run into issues, use the error checking features later on, or use our Support Forums for assistance.
The "Site Check" section of Autotune helps to setup your Joomla configuration and look for any common configuration issues.
Ensure that the "Configuration Check" area shows no issues. If found, please correct them.
In the Plugin Check area, you can publish or unpublish the plugins that were installed with JFBConnect:
The "Error Check" area will remotely fetch your website's home page and analyze it for common configuration issues. These checks are updated periodically based on support requests and common configuration or extension conflicts that we hear about from our users. Running these checks when you run into issues are the quickest way to determine the cause of any problems with social network integration.
Ideally, you should see "Pass" next to each test. If a warning or failure is shown, you should see some information as to the cause and how to fix it. If you have questions, please see our Common Support Questions for "What do these Autotune Error Check errors mean?" or use our Support Forums for assistance.
Once all the steps above are done, you can move to the "Finish" area. This page gives suggestions about how to proceed next, such as enabling the SCLogin module (to add a "Login With Facebook" button) or configuring the JFBCContent plugin (for automatically adding social features to your content).